
How to Create an Outdoor Focal Point That Lasts
A blank fence behind the dining table, a long run of exterior wall beside the patio, or the view at the end of a garden path can make an otherwise lovely space feel unfinished. Knowing how to create an outdoor focal point gives the eye somewhere intentional to land. More than decoration, it brings structure, personality and a sense that your garden has been designed as carefully as the rooms inside.
The strongest focal points do not have to be large or complicated. They need to be visible from the right place, confidently scaled and made for the conditions outdoors. A single statement artwork can achieve more than a scatter of small accessories, especially when it is paired with planting, colour or lighting that supports rather than competes with it.
How to create an outdoor focal point: begin with the view
Stand where you naturally spend time outside: at the patio table, in a favourite garden chair, by the kitchen doors or arriving through the side gate. Look for the surface or feature your eye reaches first. This is often an empty wall, fence panel, rendered boundary, sheltered courtyard wall or the end of a straight pathway.
A focal point works best when it resolves a view rather than simply filling a spare space. On a compact terrace, the wall directly opposite the door may be the obvious choice. In a deeper garden, a feature at the far end creates a destination and makes the space feel longer. If there are several possible locations, choose one primary moment. Trying to make every wall a statement can leave the garden feeling busy.
Think about what sits around the chosen area, too. A beautiful piece needs a little visual breathing room. Dense climbers, overflowing pots and multiple small ornaments can conceal its impact. You can still create a layered garden, but let the surroundings act as a frame rather than a distraction.
Choose a focal point with genuine presence
Scale is where many outdoor schemes lose confidence. A small decorative object on a large wall usually disappears from the seating area, while an undersized arrangement can look accidental. Before committing, mark out the proposed dimensions with painter's tape or cut paper and view it from indoors and from the farthest seating position.
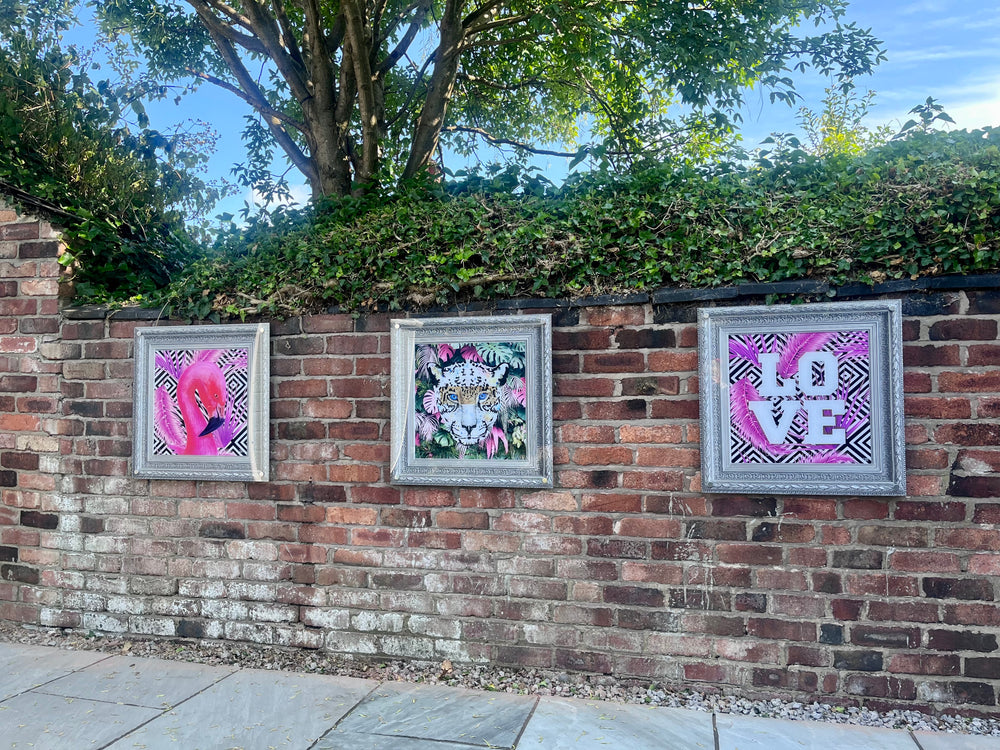
Outdoor wall art is particularly effective because it introduces colour, texture and a clear point of view without taking up precious floor space. A vivid abstract can sharpen a contemporary patio. Botanical imagery can echo surrounding foliage without becoming too literal. Vintage, equine or street-art-inspired designs can bring character to a plain boundary and make an outdoor entertaining area feel distinctly yours.
Choose a style that either complements the garden's existing mood or creates an intentional contrast. A calm, neutral courtyard may suit a richly coloured artwork that becomes the main event. In a garden already full of flowering colour, a more restrained palette can provide balance. Neither route is automatically right. It depends on whether you want the focal point to energise the space or settle it.
Match colour to the garden, not just the house
The colours outside change more than they do in a living room. Greenery shifts with the seasons, brick and timber pick up different tones in rain, and bright midday light can make a subtle shade look washed out. Start by identifying the colours that stay put: exterior paint, paving, fencing, furniture cushions and pots. These give you a reliable base.
Then decide whether your focal point should pick up one of those tones or introduce a fresh accent. Repeating a colour from the artwork in two or three nearby details, such as planters, a cushion or flowering plants, makes the composition feel considered. Keep the repetition light-handed. Exact matching is not necessary, and too much coordination can make an outdoor space look staged.
Dark backgrounds can look dramatic against pale render and help a feature read clearly from a distance. Brighter artwork can lift shaded corners where planting struggles. If your patio receives strong sun for much of the day, look for colours that will retain their depth in high light and materials designed to resist UV fading.
Build a frame around the feature
The focal point itself is only one part of the picture. The elements around it guide the eye towards it and make it feel integrated with the landscape. Use planting for softness, furniture for function and lighting for atmosphere.
For example, a large outdoor artwork above a bench can create a purposeful pause along a wall. Two tall planters placed loosely either side add height without making the arrangement overly symmetrical. A climbing plant can soften one edge, while a low gravel bed or a line of grasses leads the eye towards the wall.
Avoid treating every focal point like a formal mantelpiece. Perfectly matched pots and identical plants may suit a crisp, architectural garden, but they can feel rigid in a relaxed cottage-style setting. In that case, asymmetry often works better: one substantial container, a group of lower plants and room for the artwork to remain visible.
Use lighting to extend the effect after dark
A focal point that disappears at sunset misses an opportunity. Gentle wall washing, a low spotlight from the planting bed or nearby warm ambient lighting can preserve its presence for evening meals and late summer gatherings. Aim the beam carefully so it illuminates the feature without shining into seating areas or neighbouring windows.
Lighting should reveal, not overpower. Harsh, cool light can flatten artwork and make a garden feel less inviting. Warm white light is usually more flattering for both natural materials and printed colour. Check the result from your usual viewpoint before fixing anything permanently.
Select materials that belong outdoors
A focal point must be able to handle the weather, not merely survive a few dry weeks. Rain, frost, humidity and UV exposure are all hard on decorative finishes. Indoor prints in frames, untreated canvases and paper-based pieces are likely to warp, fade or deteriorate when displayed outside, even in a covered area.
Choose art and accessories specifically engineered for exterior use. Outdoor-grade acrylic wall art offers a clean, contemporary finish with the practical reassurance of water resistance and UV protection. It is also lightweight enough for straightforward installation on suitable exterior surfaces, making it a strong option for patios, fences and garden walls where you want visible impact without a complicated project.
At YARDART UK, weatherproof outdoor wall art is designed to make this kind of transformation practical, bringing gallery-style personality to spaces exposed to real British weather. As with any wall-mounted feature, use fixings appropriate to the surface and follow installation guidance carefully. Brick, timber, render and masonry all require a slightly different approach.
Give the surrounding space one clear job
Once the focal point is in place, edit what is around it. This does not mean stripping the garden back to bare walls. It means ensuring nearby pieces support the scene. Keep the dining table positioned so people can enjoy the view, orient a bench towards a feature wall, or place a pathway so it naturally leads to the artwork or planted display.
If your focal point sits behind an outdoor sofa, leave enough gap between furniture and wall for the artwork to be seen comfortably. If it is at the end of a narrow path, avoid placing tall containers directly in front of it. A feature can be partly framed by foliage, but it should not feel hidden.
The same principle applies to small gardens. A single well-positioned focal point can make a modest courtyard feel more generous because it directs attention outwards and creates depth. In a larger garden, you may use secondary moments, such as a striking pot or specimen tree, but let them remain quieter than the main feature.
Refresh the focal point without starting again
A well-chosen outdoor artwork can stay in place through every season, while the setting around it changes. In spring, fresh foliage may soften the edges. In summer, colourful cushions and flowering pots can amplify its palette. Autumn grasses and deeper textiles create a richer backdrop, while winter lighting keeps the area inviting when the garden is more exposed.
This seasonal flexibility is one reason a wall-based focal point earns its place. It gives the garden a permanent visual anchor while allowing planting and accessories to evolve. Rather than buying more objects to fill every corner, invest in one feature that makes the whole outdoor space feel more deliberate.
Choose the view you want to come home to, give it enough scale to be seen, and let the rest of the garden quietly lead towards it. That is how an unused wall becomes the detail guests remember, and how an outdoor space begins to feel like part of your home.


Leave a comment